Laser Cutting SOP
Approved July 23, 2020
Esteban Limon
Page currently under construction. View the online document version here
Introduction
I made this so that the Hive could have a permanent SOP on laser cutting. Hopefully it won’t need to be updated much in the future. Much of the information covered in this long document was created through personal experimentation and information given by the ULS laser manual
Hopefully you find it useful. Please reach out to me if you find any errors in this document or you feel as if I need to cover something in more detail. I may update this document as time passes and we discover more about the laser cutter. That being said, if you discover something you want me to cover, also let me know. The table of contents should be able to navigate you pretty well.
Laser Cutter Safety
Before we begin touching upon how to use the laser cutter, it is important to note right off the bat what you should never cut for a variety of reasons mostly dealing with toxic gases and high fire risks. Here is a good list to follow:
| Material | DANGER! | Cause/Consequence |
|---|---|---|
| PVC (Poly Vinyl Chloride)/vinyl/pleather/artificial leather | Emits pure chlorine gas when cut! | Don’t ever cut this material as it will ruin the optics, cause the metal of the machine to corrode, and ruin the motion control system. |
| Thick (>1mm) Polycarbonate/Lexan | Cut very poorly, discolor, catch fire | Polycarbonate is often found as flat, sheet material. The window of the laser cutter is made of Polycarbonate because polycarbonate strongly absorbs infrared radiation! This is the frequency of light the laser cutter uses to cut materials, so it is very ineffective at cutting polycarbonate. Polycarbonate is a poor choice for laser cutting. |
| ABS | Emits cyanide gas and tends to melt | ABS does not cut well in a laser cutter. It tends to melt rather than vaporize, and has a higher chance of catching on fire and leaving behind melted gooey deposits on the vector cutting grid. It also does not engrave well (again, tends to melt). |
| HDPE/milk bottle plastic | Catches fire and melts | It mels. It gets gooey. Don’t use it. |
| PolyStyrene Foam | Catches fire | It catches fire, it melts, and only thin pieces cut. This is the #1 material that causes laser fires!!! |
| Fiberglass | Emits fumes | It’s a mix of two materials that can’t be cut. Glass (etch, no cut) and epoxy resin (fumes) |
| Coated Carbon Fiber | Emits noxious fumes | A mix of two materials. Thin carbon fiber mat can be cut, with some fraying - but not when coated. |
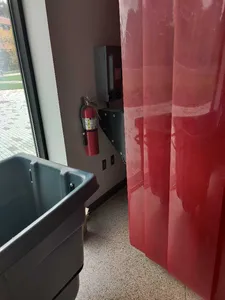
In the worst-case event a fire does start, we have a fire extinguisher in the room located behind the plasma cutter. Of course you should be sure to contact any emergency services such as GTPD: (404) 894-2500 as well as the director of the space Kevin Pham: (404) 894-2960
The fire extinguisher is here:
Getting Started with the Laser Cutter
There are a couple of things you must do to use the laser cutter effectively. Specifically, they are (in no particular order):
If you would rather watch the YouTube video: https://youtu.be/yCWKfAJsYsw
- Turn on the ventilation. There are two grey switches to the left of the double doors - flip both switches. Turning on ventilation ensures that noxious fumes emitted from the material you are engraving WILL NOT stay in the room, but rather sucked in and carried away from everyone in the room.
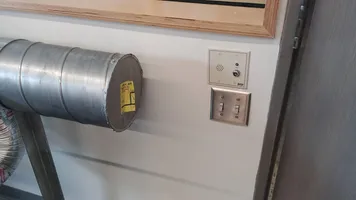
- Enable air flow to the laser cutter. This will ensure no particulate debris can be trapped within the laser cutter lens (i.e. the laser lens won’t crack!). Each laser cutter has its own air flow valve located behind it. It’ll look like this:
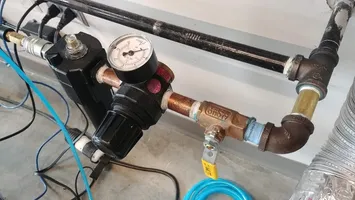 Turn the valve perpendicular to its starting position to allow for airflow. You should see the pressure gauge no longer be at zero (and you should hear a zip of air!).
 - Enable power for the laser cutters. First, flip the breaker switch (the left breaker corresponds to the left laser cutter, the right breaker to the right laser cutter). The breakers are located in a corner of the room behind the left laser cutter shown here:
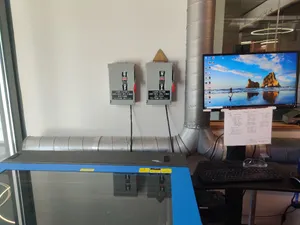 Once the breakers have been flipped, the laser cutters can now turn on. To turn on the laser cutters, a switch must be flipped right beside the power cord seen here:
 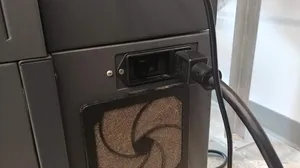 Once everything has been done, you can now effectively cut anything you send to the laser cutter’s UCP (universal control panel)
The Power of Illustrator
While it is true that the laser cutter acts as some sort of printer driver so any application that enables you to print can technically send files to the laser cutter, the Hive prefers using illustrator. This section will be dedicated to covering the basics of illustrator for all of your laser cutting needs.
Getting Started (Creating a File)
When you start illustrator, you will most likely be greeted with a screen like this:

To get started, follow these steps:
- Press Create new to create a new file which will bring out a new window with multiple tabs
- Navigate whatever tab makes sense to what you are working on
- The recent tab shows you what has been worked on recently
- The saved tab is where all the Hive’s saved templates would be, one of which is a template of the laser bed (32 in x 18 in)
- There are a bunch of useful tabs covering anything to do with different types of paper, technology screens… you name it
- For a new template completely, go to any other tab and select a preset such as the print tab and select the letter template of which you can change the properties on the right side:
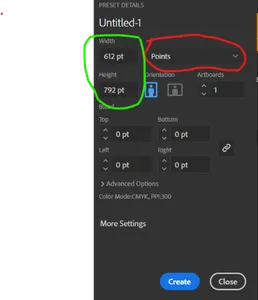 Above the circles, you may name the artboard you will be working with. The red circle is where you can change the system you are working with (in, cm, mm, points etc). The Green circle is where you may change the dimensions of the artboard you are working on (you may change this later). It is recommended that you make the width and height the dimensions of the item you are trying to engrave or cut.
- Hit create when you satisfied with everything and you will be generated a blank artboard for you to do what you please.
The Basics of Illustrator
I made some illustrator tool videos that you can also watch:
Zoom, Hand, Selection Tools: https://youtu.be/_AkUbFi3oCM
Shape Tool and Text Tool: https://youtu.be/mJ0yXttc_t4
Art Board, Pen, Curvature Tools: https://youtu.be/4qVjjKtLYFA
There are a number of tools you may find of use to you while you work on your respective projects. Everything covered in this section is dependent on you using the essentials layout. You certainly don’t have to, every other layout has its uses, but I find this to be the more useful layout. If it isn’t in essentials, you can change that by clicking on the tab here next to the search bar:

The various tools can be found on the left-hand side of the artboard. Roughly ordered by importance, below are a few that I find useful, their descriptions and how they work.
As a quick aside, here are definitions that you should know before moving on.
The Selection Tools
The selection tools allow you to move and change the properties of any path or point. You can think of these tools as a mouse of some sort.

The types of selection tools
- The selection tool (the top most shaded pointer looking object) allows you to target whole groups or objects by either clicking on the object (which will highlight everything apart of it) or by clicking and dragging an imaginary box and everything within it will be highlighted
- The direct selection tool (the lighter looking pointer) allows you to isolate paths, anchor points or individual objects within a group.
Making changes with a selection tool
- Clicking on or highlighting an object (like a rectangle or a picture) will show you the properties of that object on the right side of the window
- The transform settings will tell you everything about the shape of the object (in this case a rectangle). The X and Y tell you the position of the object. W and H tells you the width and height of the object (the paperclip looking thing to the right of W and H allow you to cycle between changing W and H in proportion to each other or not). You may also adjust the angle as well underneath X and Y.
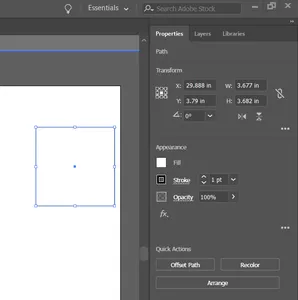
- In addition, you can change these as you would in other applications. You can click any point and drag to change the width and height. Holding shift allows you to maintain width and height proportions.
- You may also change your point of reference in the little rectangular box next to the transform settings. You may choose to reference that rectangle by any of its corners or sides (right now it is position is referenced by its center). Each reference point has it’s own coordinate, so if you wanted the shape to be in the top left corner, you would want to make the reference corner be the top left point, and make the X and Y coordinates 0.
- The appearance settings control the appearance of the object. Here you can control fill (the inside color of the object), stroke color and size (the line color and size of the object’s line) and opacity. The Fill is changed by clicking on the white box next to fill, the stroke color is changed by clicking on the black rectangle and its size can be adjusted to the right of the word stroke. The appearance settings will be especially useful if you are trying to vector cut.
The Pen and Curvature Tools
The Shape Tool
The Type Tool
The Artboard Tool
The Zoom and Hand Tools
Illustrator in the Context of Laser Cutting
(Or, Using Illustrator Practically)